Monday, June 17, 2013

Swans and flowers and tutus oh my

 I haven't posted for a while due to the large amount of work I have had on recently.
After finishing the Civil war ball gowns I had to hustle to full fill an order for Swan lake bodice overlays and plates for a customer, make a dress, veil and hats for my brother's wedding, sew 20+ costumes for a local dance recital, work on a gold metallic tutu for a customer and work on an enormous number of alterations.
First things first. A customer contacted me about Swan lake tutu decorations. I began by drawing a number of sketches for the customer so that she could choose what she liked and could afford.
Sketches of bodice overlays.

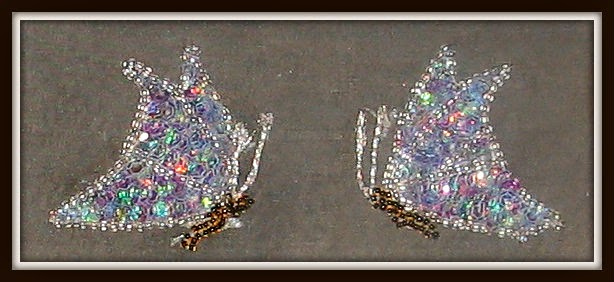
After that I ordered the rhinestones (Rhinestone guy's premium hot-fix crystals which are awesome), selected trims, cut the bodice overlay shapes, cut out 164 fabric "feathers" and the wing shapes.
fabric "feathers" for San lake plates
To make the bodice overlays, I pinned then sewed a false nude panel and silver rim onto netting, then glued hackle feathers and applied hot-fix rhinestones.

Swan lake bodice decoration overlays
To make the swan wing shaped decorations, I pinned and appliqued the feathers to heavy duty interfacing shapes, sewed this onto netting plates and applied the hot-fix crystals.
One swan lake tutu plate.
The basic technique and patterns for these tutu decorations are described in Claudia Folts book: "Finishing touches".
Next I worked on several items including a 1920's inspired wedding veil for my brother's wedding. I will write a separate post on that.
Next I worked on a large project of 20+ costumes for a dance recital. The theme of the performance was the parable of the sower and the seeds. The smallest children in the recital were to represent seeds being planted in the earth and then sprouting into beautiful flowers. My idea for the costumes were earth toned t-shirt, tights and tutus with petals that would drop down to "reveal" tulips, roses, sunflowers, daisies, clover and morning glories. The middle group of students were to be dancing princesses and the oldest dancers were to represent a gardener tending flowers (hyacinth and lavender).

fabric petals for 9 children's sprouting flower costumes
For the little children's costumes I ruffled large amounts of earth toned tulle, which I sewed to elastic waists, over which two rows of brown and colored petals were stitched. Ribbon loops were attached to the brown side of the petals, and when they were tied up with ribbon, the children looked like little brown seeds. Once the ribbons were untied, the petals dropped down to reveal their "true" colors.
For each of the dancing princesses I made flowered circlets with hand-made ribbon flowers on them, and tulle and ribbon streamers (the technique for this is also described in Claudia Folts' book, "Finishing touches").


Flowered "princess" headpiece with ribbon work flowers
For the dresses I drew out a new pattern combining elements from an old "Gunny Sachs" and "Daisy Kingdom" pattern. The dresses were made of pink, lavender and cornflower blue crepe with wide chiffon "princess" sleeves.
The beginnings of six "princess" dresses


Finished princess dress with headpiece
Lavender dress
Cornflower blue


For the oldest group of dancers, I made two Romantic length "petaled" tutus, with green tights, and top and for the gardener a yellow cotton and chiffon dress. The dancers representing the flowers had green velvet and ribbon work headbands, while the gardener wore a purchased straw hat. To reduce the fullness of the petaled tutus, I quilted the tulle along the hip line.
"Hyacinth" petaled tutu

"Lavender" petaled tutu


Green velvet and "lavender" ribbon work flowers
Finally I received an order for a custom made, gold metallic tutu. I loosely based the coloring and design on the Gold Fairy tutu I had made for a performance of Sleeping Beauty.  Key difference were that this tutu did not have as many layers of double hand pleating in it (three layers instead of 6), used some gold metallic mesh, a different type of enhanced sparkle net (purchased from Tutu.com) and a black basque instead of a gold basque. 

Gold mesh and gold enhanced sparkle nets

Original design + notes for the "Gold" fairy from Sleeping beauty

As for the original tutu, I did dye some of the tutu net and the pants a rich gold. I also, spray painted plastic tacks with gold metallic paint to hide them during tacking.
Bottom of tutu with hand-pleated god mesh and dyed to match panties.

The finished tutu looks very even and will be going out to the customer in the next day or two.

 
Completed gold tutu with black powernet basque
My plans for this summer are to work on custom leotards (I will post about this soon as I have started on the first 4 samples), go to Tutu.com's tutu school again (this time to learn men's costuming) and finally work on building some rental costumes for the fall.


How much??? charging what your time and work is worth

In this post I am going to talk about a touchy subject. What should one charge for custom work and what are reasonable expectations that customers can and should have when working with a costumer?
Due to the internet and cheap imports of clothing from China, many of us have the expectation of being able to buy a dress, skirt or even ballet costume for $20.

 There is a huge difference though in quality and fit between something mass produced and an item made, by hand, by a costumer. "Internet" tutus are often made with inferior materials such as hexagonal "craft" net, or stiffened cotton fabric. "Real" tutu netting can cost any where from $1.25 p/y to $25.00 p/y (this depends on color, glitter, sparkles, and stiffness) and a proper, professional quality, tutu has about 10 yds of pleated netting in it. Professional tutus are "built" not just sewn on fabric panties. This fabric can cost between $10-$40 p/yd.
Like all beginning costumers, I know I do not charge enough for my work. I recently made some bodice overlays and tutu plates which ended up being just above cost.  For each step, I sat with a timer, timing how long it took me to cut out, pin, glue, sew etc.etc. I now know have a much more accurate idea of how much time it takes to make things and can charge accordingly. Minimum wage in NY is $7.50 p/h, I have always calculated $10.00 p/h as my work is more "skilled" labor but honestly, that is dirt, dirt cheap. My 14 year old daughter was hired to do a house cleaning job and got paid $15.00 p/h ?! so I think it is only right and proper that I will be charging more in the future.
How much time does it take to make a professional tutu? I recently created a tutu and it took me 8 hrs of cutting, pleating, sewing, steaming, tacking and finishing.  I have made over 100 tutus in the last few years so it takes me a lot less time than a novice to sew a tutu, but at $10 p/h that is still $80.00 just for the labor. To hand-pleat a (top) layer, it now takes me, about 20 minutes but if I am pleating tulle, it takes longer.
This tutu was also a "plain" tutu, without a bodice, hoop, hand tacking and no additional decorations.
Making a tutu plate, with lace, appliques, crystals, feathers or other decorations can take a few hours and the materials (lace, trims etc.) are not inexpensive. Rhinestones range in price from $20-$45.00 per gross (144 pieces) depending on color, size and brand.
What about headpieces? Again, when you buy something from a costumer, you are getting hand work. If the tiara is made on a wire frame, these frames are bent to shape and then the crystals are wired on, one by one, and by hand. Something as "simple" as a Swan headpiece, which consists of feathers on a felt shape, still has to be hand-sewn and glued. The shapes are cut by hand and have individual loops sewn to them so that the headpiece can be pinned to the dancer's hair. The "right" types of feathers are also expensive and are seasonal. At one point, my wholesaler had the hackle pads on back order for 3 months due to the bird flu scare in the Far East.
As with everything in life: if it seems too good to be true, it probably is. A professional tutu (with a bodice, decorations etc.) will cost around $500 and up, headpieces $25.00 (super simple, with few, inexpensive decorations) and up.  Can you find something cheaper online? Probably, but will it really be worth it? probably not.

Monday, May 6, 2013

Belles of the Ball part 2: the completed dresses

As promised I am posting the completed Civil war ball gowns, with headpieces.
The duck-egg blue dress has three tiers of ruffles, with hand-cut gold lace. The skirt is pleated and cartridge pleated to get the 8 yards of fabric sewn to the tiny basque. The headpiece is a ruffled lace, light gold lace, pink velvet ribbon confection that is pinned to the hair. For an authentic touch, the pale pink rose and leaf decoration is made with French wired ombre ribbon.
The duck-egg blue dress, with headpiece
A close up of the headpiece:
The dress's bodice was based on a Tutu's the dance (Suzanne Dieckmann) bodice. The skirt (based on a Simplicity patern and Janet Arnold Pattern's of Fashion) is worn over an elliptical cage crinoline (Laughing Moon pattern):
My daughter's deep plum colored dress had a new bodice (made from Travis Halsey's "Regal" bodice pattern). The skirt is a five-gored skirt worn over an elliptical cage crinoline.


Plum colored taffeta dress
Finally the lilac taffeta dress, has the same basic bodice as the duck egg blue dress, but different accents. The dress has ribbon work appliques on the shoulder and a pleated front drape. The front drape was inspired by a dress described in Janet Arnold's Patterns of Fashion.

Detail of bodice with a front pleated drape and ribbon work appliques
The skirt is pleated and cartridge pleated and worn over a full petticoat.
Lilac purple taffeta Civil war style ball gown


This dress has a net and ribbon headpiece to go with it in various shades if lilac, periwinkle, royal blue and greens. I do not have a photo of that headpiece yet but I also made a second headpiece in shades of purple as a gift for another girl. Here is it:


Monday, April 22, 2013

Belles of the ball

Every year our local home school group has a civil war ball as an alternative to the standard prom. The kids love it because it removes a lot of the pressure to find a date, boys and girls dancing together etc. but they can have a great time getting all dressed up and just having fun.
What the dance does require is an authentic looking dress. This year I am making two to serve as rentals (for this but they could also be for the party scene in the Nutcracker) and my daughter needed a new bodice as she had grown. It is a good idea (and authentic) to make a bodice and a skirt rather than a dress. This allows alterations to be made more easily, and you can switch bodices for a fresh look.

My daughter in last year's  plum colored dress
I drafted new bodice patterns for all three girls and cut out toiles out of an old sheet, then went back made adjustments and cut out the lining fabric (a heavy 100% cotton twill).
My daughter's new bodice was inspired by Janet Arnold's "patterns of fashion" illustrations, Travis Halsey's "Regal" bodice and my own reworking. I changed the neck line and added sleeves.

My daughter's bodice in plum colored taffeta
The bodices for the other two dresses were a reworking of a Tutus that dance pattern (#2102) with a different neckline and sleeves. One will be in a pretty lilac taffeta, the other in a duck-egg blue.


Lilac plaid taffeta for dress 1
The lilac taffeta will have a draped front neck, as shown in the Janet Arnold illustration, while the blue dress is going to have ruffles, ribbons and flowers. These dresses will also have some lovely headpieces: one a simple hair band of ribbon rose, the other a lace and flowered "bonnet".
Beginning of the duck egg blue faux silk dress.
I worked on my daughter's bodice first as I had her to try things on. I have also been taking an online class called the "Couture dress" with Susan Khalje on Craftsy and learned some new basting and ironing techniques to get the underlining piece nice and flat.
One issue with taffeta (and other fabrics such as silk satin) is that you have to be very careful not to make mistakes, or when pinning, as it can mar the fabric. I made such a mistake on the purple bodice with the right panel so that it is is not 100% smooth. Also, to get the bottom cording into a nice sharp point, it is important to clip seams, carefully (hand) baste down seam allowance etc. so that everything will lie flat.
I spent what seemed like forever ironing the fabric, pinning, repinning etc. but the end result was well worth it. With taffeta's, satin's etc. it helps not to actually place the iron on the fabric but hold the steam iron above the fabric to "relax" it and then gently smooth and pull. Again a too hot iron can mar that type of fabric.
my daughter's purple taffeta bodice
My daughter's bodice looks good but the second bodice I made looked better.
Bodice 2 in duck egg blue
The sleeves on the duck-egg blue dress are lined and gathered. Once I've done another fitting I will begin to add lace, ruffles and other decorations to this bodice. The third bodice is a plaid taffeta and I tried hard to match the plaid but due to the shape and the bias cut panels it just was not possible to match everything perfectly.
Bodice 3 in lilac, plaid taffeta

This third bodice will had a pleated front as decoration. Both skirts will be cartridge pleated unto a basque style waist.
It is hard to photograph cartridge pleating. It is a technique which allows a large amount of fabric to be neatly gathered into a very small space.

Cartridge pleated skirt

"Bertha" and some ruffles for dress
The duck egg blue dress will have several layers of ruffles and a ruffles "bertha" in soft pink and gold lace.

completed duck egg blue bodice
Most of the pieces for the dresses are now assembled and once I have sewn them up I'll post some photographs.
Dress skirt ruffled and pinned.

The dresses will also have complimenting headpieces made with ribbon embroidery and I'll include a little write up of that. Enjoy!


Thursday, February 21, 2013

Seeing opportunities: turning thrift store finds into beautiful hats

I have seriously caught the hat making bug. I found a lovely Vogue pattern and wanted to make some cocktail hats:
http://voguepatterns.mccall.com/v8868-products-44627.php?page_id=181
Big problem: the materials listed are either not available or only through a whole saler. To make one hat I would have had to buy over $300 worth of supplies. After that I could make about 70 hats, but unless I have buyers lined up, that wasn't economically viable.
I am a thrifty person and since starting on this costuming journey, I have developed an eye for opportunities. While at one of my favorite thrift stores, I found a hat, a very ugly hat, but I realized that the materials were good quality horsehair.

Ugly thrift store find=great materials
I bought the hat and then took it apart. With just a little work, some feathers from my stash within a short time I had a lovely hat.

This type of hat is great for dance too as it is light weight and can be securely pinned.
Emboldened by this success, I went on to look at other types of hats. I found a wonderful blog called Hatstruck, and read several posts and then watched a great collection of videos on different hat making techniques. Sinnamay or hand woven grass makes lovely hats, but is very expensive. Hat blocks also can run upwards of $130 and my budget just isn't up to that.
A sinnamay place mat, some wooden bowls will become a hat
Thanks to the ideas on Hatstruck, I looked at the thrift store for materials for the hats, and found some handwoven sinnamay placemats, a wooden bowl and a little wooden lid with a lip. I drew a pattern, steamed and blocked the sinamay and then cut it out.
Blocking sinnamay

The sinnamay needs to be stiffened with something because it does not hold its shape very well. I have some rice starch which I am going to try but it may be that I will have to order proper sizing.
Just blocking the sinnamay with water and steam does not work long term. I got a ice shape but when I tried sewing it, the sinnamay just lost its' shape. So, I tried the rice starch. This is called Nori past and is used by the Japanese in making Kansashi flowers. I figured since it is used for giving silk (a natural fiber) some body, it should work on grass.  the only down side I can see is long term. Since rice starch is a natural product it could become moldy of the hat every got damp. Eventually I will order the "proper" supplies but since I am learning techniques now I figured this was good enough.

Sinnemay blocked with Nori paste
I took my foam head, covered it in cling wrap and then took the sinnamay, which I had first moistened with warm water, and pinned it onto the the head. Then I used a foam brush and brushed the Nori paste onto it and let everything dry overnight. This worked very well; the sinnemay was firm but still pliable. I then cut out a tear drop shape, rolled the edges to form a bound edge, made a wire shape and sewed everything together. I then covered the edge with some rayon ribbon. You could also use millinery gross grain.
While "researching" hat making techniques I came across some images of french ombre flowers. They are made from millinery gross grain ribbon and French wired ribbon. These items are pretty pricey to buy, if you can find them. My great aunt at one time made hats and I had a big box of trims in the cupboard. I never knew what to do with it but now, endless possibilities.

Huge box of vintage trims, millinery ribbon, rickrack etc.


I used some of the ribbons to make some ribbon flowers and then added this to the hat. I am still playing around with where to place the flowers and what I want the hat to look like but I think this is a pretty good first run.
Front view of the cocktail l hat with flowers
Side view of cocktail hat
I'll be trying some other techniques, shapes and ideas and I'; keep you posted.


Saturday, February 9, 2013

Making hats for ballet


Just this week I made a hat for a dancer sight unseen.  When making a headpiece or any costume item choosing the right materials and colors is very important. The hat I was making was going to be brown with cranberry colored flowers. Sounds easy, no? but what is cranberry or even brown for that matter? Here is just a small example of shades of cranberry:
 If we are really honest though, color choices are much more like this; just look at the bottom row for "brown":
Since I did not have any fabric swatches I just guessed and made what I thought looked good; a bit risky but I figured if it looked pretty and had several shades, even if it wasn't a perfect match it would still look good. A good way to help with choosing colors and being on the same page when it comes to talking about colors  is to go to the paint store and select some of those chips.
Due to time constraints I had to go with what I had available so I dug into my stash and found some lovely velvets and some lilac and "cranberry" red silk. The dancer and I decided on the brown velvet for the hat base and then I came up with the idea to take silk organza and dye it several shades of "cranberry".
Fabrics from stash

 The next challenge for a ballet hat was its design.
Brown velvet, wired buckram shape and cranberry silk organza for the flowers.
No one wants a hat to fall off but on a dancer staying on your head is a minimal requirement not just "would be nice". A ballet hat has to be fairly strong too. A while back I purchased an e-book from Prudence millenry to help me learn how to make couture flowers and headbands. Using the methods describe there I made a frame of wire and buckram, covered it with some flannel and then applied the velvet. The book called for ice-wool, a short of wool knit batting but that is very hard to find and expensive so I substituted flannel as the flalene. I then dyed horsehair (a nylon, millenry mesh braid which is very strong but will blend into the dancers hair) and some mesh elastic and sewed that onto the bottom of the hat.
The flowers were made by hand, using bias cut tubing and hand cut petals. I also made some Yo-yo style daisies and sewed glass beads into the center to simulate stamens.
Although there are specialize sewing machines to sew hats, you can use a regular machine, I ended up sewing everything by hand to get the tight, clean finish I wanted. The book also shows that to get the best results, the hat shape should be hand sewn.

Hat after blocking
I then blocked and shaped the hat form. To do this I pinned the shape to a foam head and using steam, which softened the glue in the buckram, I reshaped it. Once the hat cools down, the buckram stiffens up again so that the hat keeps it shape. The horsehair on the bottom of the hat and the mesh elastic strap (which runs along the back of the head at the base of the skull) allows the hat to be pinned all around so it will not come off.

Close up of the flowers and hat.
I was happy with the completed hat and after testing it (sounds silly but I feel an once of prevention is worth it), it was packed up and sent off. Another busy week but certainly not dull!

Sunday, February 3, 2013

Odette, Odile and Diana: more tiaras, crowns and headpieces

Gold lace and Swarovski hot fix crystal headpiece in Tanzanite and pinks.
The last few weeks have been so much fun for me with designing and making more ballet headpieces. I continued to work on the headpieces I had been making and finished both the gold and fuschia princess ones and the silver Diana one.
Silver Diana headpiece with large crystals AB and Swarovski ligh sapphire stones


Then I received an order for an Odette (white swan queen) headpiece from a dancer in California, so I finally had enough in the kitty to purchase supplies. When the packages arrived from the whole salers it was just like Christmas: all those gorgeous sparkly stones, real Swarovski teardrops, briolets and several gross vintage Precosia rosee montese and snowy white hackle pads. While waiting for my packages I had made the felt shapes for the feathers and my husband had made the wire frame.
The day the supplies arrived I set to work and by early evening I had a feather shape and the beginnings of the jewel:
Start of an Odette headpiece

Ideally, you need to try the feather shape on the dancer so that you can trim the feathers but since I could not do that I tried the headpiece on my daughter and then carefully trimmed, glued and sewed the feathers in place. The difference between this head pieces and the original one I made for Leila was remarkable. Real stones are just so much more sparkly and having the right shape to the feathers is more elegant.
Don't get me wrong. Leila looked stunning in her costume and the headpiece was beautiful but the new headpiece was just more so. Judge for your self:
original Odette headpiece

new Odette, sent to California
Now that I have so many beautiful supplies I am going to create another Odile (black swan) headpiece and I have been drawing designs for a slew of other ones. I am especially inspired to make some beautiful  fairy ones. I'll keep you posted on how that  goes.