Thursday, November 28, 2013

Nutcracker Headpieces

At this time of year, Nutcracker is just the thing. There are lots of post and ideas out there for tutus and costumes but maybe not so much for headpieces and certainly not for certain roles. If you were to search for it you can find endless Sugar Plum's, Snow queens and probably Arabian but how often have you seen a headpiece for the Dew Drop fairy, Chinese, the Merlitons or the party guests?
Several years ago I made a series of little hats for the party guests in the Nutcracker, including a rather fancy ruffled lace bonnet for the grandmother. In the version of the Nutcracker our local ballet company performed, the party guest come through the theater, and then walk onto stage, acting out that they are arriving at the house.
Nutcracker is often set in some middle to late Victorian style so I made the hats like late Victorian "bonnets", usually a small hat, festooned with ribbons and lace that sits towards the back of the head.

Late Victorian style hats
 Lynn McMaster has some wonderful tutorials and patterns for hats and period costumes. I do not own any of her patterns (yet) but did use her information as inspiration to make the hats I did.
Grandma's "bonnet"

 Milliners used to use something called a poupee or stylized head to drape and display their hats.
If you try searching for this, you will often see images of this:
A wig stand used as a poupee
but this is actually a wig stand. A real Poupee has a stylized face and they are very difficult to find.

If you do find one, they are often very expensive. You can have one custom made in Spain but again it is expensive. While looking for one I found an Etsy store: handworkstudio that sells instructions and kits to make a felt poupee. My daughter loves to do needle felting so I asked her to make me one.
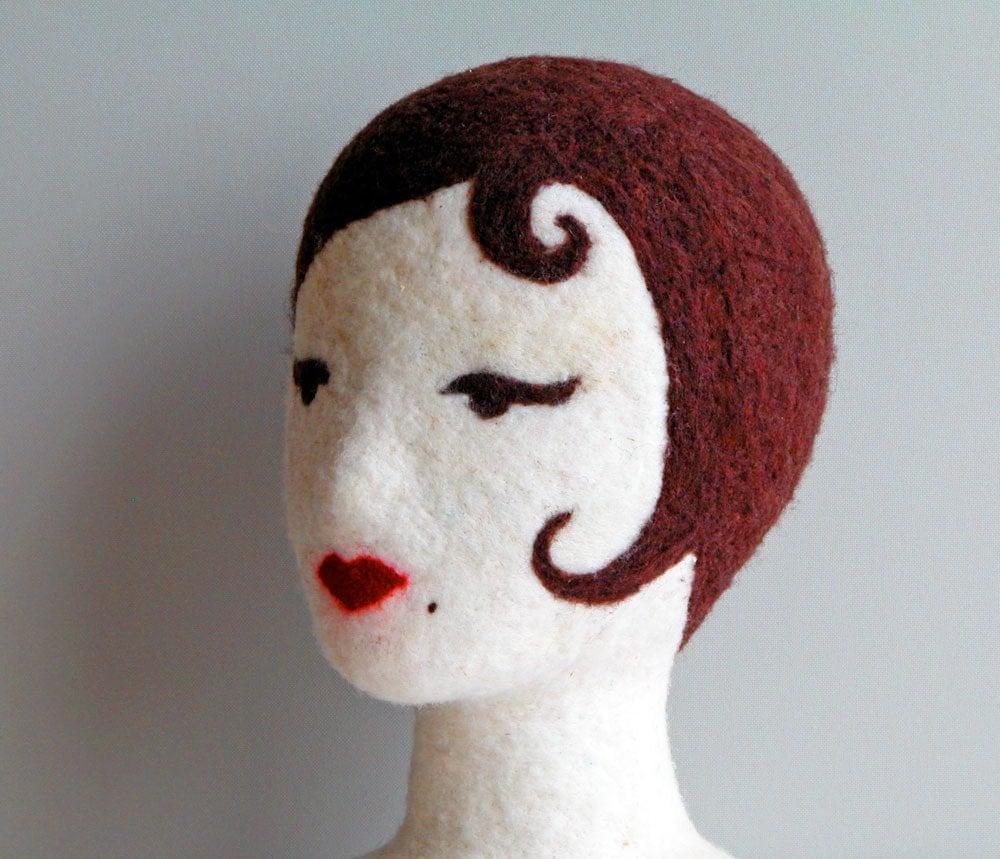
I love my felt poupee by Handworkstudio

 This lead to the "birth" of Ruby. She has soft, pale pink skin, lovely dark brown hair, done up in a classical ballet bun and bow lips. She still needs to be felted (more) but she is lovely.

I was so thrilled with her that I put her to work right away to create a Chinese themed Nutcracker headpiece.
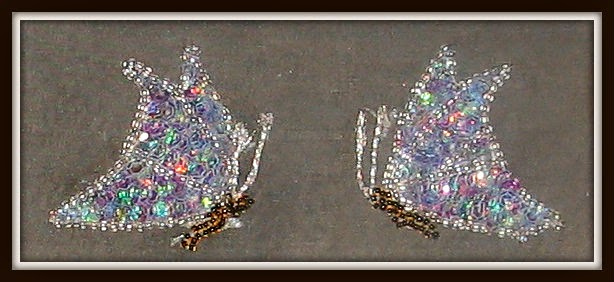
I had become interested in soutache tape bead embroidery
example of soutache tape bead embroidery
and after looking at several Chinese bridal headpieces
Chinese wedding headpiece

decide that it would be a perfect technique to use on my "creation". The traditional bridal headpiece is too big and has too many things sticking up and dangling to make it a practical or safe proposition for a ballet headpiece. I took some of the elements, mostly the gold, red (a color symbolizing good fortune) and turquoise colors, a few smaller side dangles, made with wire so that they would move but not bounce about, bend and become entangled in hair, or worse put the dancer off balance, or poke someone in the eye (if partnered). I sat and sewed layers of red, gold and sparkly turquoise soutache tapes around red crystal bicones, and blue/green round mock jade beads to create snakes or dragon shapes and added eyes, scales and other details with hot fix crystals and sequins. The little dangles were made of gold colored, lazer cut butterflies, Swarovski bicones and little gold colored leaves. I wanted to have something that would move and catch the light without being too heavy or a distraction to the dancer. I had found a very interesting gold mesh which I used and shaped along the front and back of the headpiece and to support the gold ruffled lace at the back. The whole headpiece was built on a sturdy wire frame.

Close-up of the soutache tape "dragons" and front jewels of the Chinese headpiece.

Completed Chinese headpiece on Ruby, my felt poupee
When Tutu.com announced a Nutcracker headpiece competition, I decided to enter this just to get some sort of feed back on the ideas. To my utter (happy) surprise, I was chosen as a semi-finalist. Since this sort of thing usually seems to be dependent on how many Facebook friends and relatives you can get to vote for you, and I only had three votes (two from my brother and his wife, thanks!) I did not expect to make it through the first round. You can still vote for my headpiece at Tutu.com Facebook Nutcracker Headpiece competition till the 30th of November 2013.
Earlier in the summer I had made a Sugar Plum

Sugar Plum headpiece made with Swarovski and RG premium crystals in crystal AB, Fuscia, Tanzinite and Light Colorado Topaz

and a Snow Queen headpiece


Snow Queen made with Swarovski, Czech and Vintage Crystal AB and sapphire
, both modeled by the lovely Bridget, and I still want to make a Dew Drop fairy but time is a strange thing in my house. I truly believe that the fabric of time is somehow broken as some things seem to take forever (laundry, house cleaning, anything tedious) but creating costumes seems to make time disappear. What seems like 5 minutes actually turns out to be hours.
I am now deep into making leotards and my first YAGP costume (very exciting) so  it will be a while before I can get back to these headpiece. It does look as if  after Christmas, I will be working on a comission for some very exciting headpieces but that will have to stay under wraps for now.
Have a happy, not too nutty, Nutcracker season.

Thursday, November 7, 2013

What no posts lately, better fix that!

Hi everyone, I suddenly realized it has been a while before I posted something here so I really have to fix that.
It has been an "interesting" few weeks here. After having my machines cleaned and serviced this summer, I was hoping for a "worry" free time. Hope springs eternal but it was not to be.
My main machine developed all sorts of issues from sucking fabric into the throat plate, jamming and breaking needles. My "new to me" Bernina-530-1 (it had been my mother's, I used it for years until I replaced it with my current Lily) came back from my brother's and the first time I used it, caught fire and had stinky black smoke pouring out of it.
A Bernina 530-1 record machine
 This meant that within the space of a few days I had no sewing machine. About a week after they went in for repairs, I got an order for two tutu bags. Thinking that I would not be without a machine for as long as I have been, I took the order. Well the fabric + notions arrived but still no machines. I cut everything out, cut miles of bias for cording and still no machines.
Finally, I sent out an appeal to friends and was able to borrow a machine and I "requested" that the store lend me a machine, so I could make the cording for the bags. Finally today I received a call that the Bernina is ready, the Husqvarna not sure when it will come back.

Being with out a machine for a while allowed me to finally finish the Nutcracker coat I had started to make. I added trim, buttons and loops of navy and gold cording to the front of the jacket. I had seen some photographs of dress uniforms, which I used as inspiration for "my" coat.

Dress uniform originally worn by Prince  Albert Victor


Not everything could be used on a dance coat as dangeling loops, and big medals can be dangerous and just too heavy. I think that I came up with a good compromise that worked well on the coat.

Another (German) dress coat. see the detailing on the cuffs
I took some of the detailing from the cuffs and made appliques on netting. This allows the cuff decorations to be removed before laundering (the sleeves are detachable).


cuff applique detail
I am not sure what the back of a dress uniform looks like but with Jeremy Bardoni's(the designer of the pattern and instructor at tutu school NY) help we came up with this design.


All the loops on the front of the coat are firmly sewn down onto the coat so that a dancer cannot catch on it. I made black dance-boot toppers at tutu school and also have two sets of tight pattern so once I find a suitable dancer I can complete this costume with matching navy blue "pants" and boots as in the photograph. I am very happy with how everything has turned out so far.
Completed front of the Nutcracker coat


Thursday, October 3, 2013

Rubberband girl: sewing more leotards, unitards and biketard

Well, after my first blog post about sewing with stretch fabric, I have continued to experiment with getting  a professional look on my leotards.
I had been using a variety of lycras (nylon lycra, milliskin, cotton lycra), meshes and lace and different pattern styles. Besides using patterns made by Suzanne Dieckman (SD square neck #6000 and sweetheart neck leotards #6006), Claudia Folts (CF camisole leotard and CF unitard) and Kwik Sew (biketard) I have been making my own minor changes to them.
I have been very happy with how Suzannes' leotards have turned out. While they are not the simplest ones for a novice to start with due to the many pieces, the pattern works very well. The dancer's I've made the leotards for have commented that they especially like that they do not bunch or ride up in the back.
SD # 6000, nylon lycra, front lined with light weight nylon powernet


I experimented with leaving the leotard unlined, adding a bandeau lining, a lining using the same fabric, and two different types of lycra lining. I also tried leaving the mesh unfinished and finished using a bias cut facing.
SD #6006, milliskin & mesh, unlined

finished leotard, unfinished mesh
leotard with the mesh finished

back view of SD #6006


I probably should have made the CF camisole leotard as the pattern showed first before deciding to change things. I found making the straps tricky as the arm holes seemed to come out very small and making the straps lie flat and neatly stitched did not work well for me. It probably is just a matter of grading the seams more, and practice.
Claudia Folts camisole front
bandeau lining
CF camisole back


The CF unitard went together like a dream. Maybe it was the amount of practice I had already had, maybe just a different pattern or fabric but I did not have as many issues with it.
I used cotton lycra for this unitard and washed all the fabric to prevent it shrinking. This unitard is also fully lined in the front.
CF unitard in cotton lycra, adult petite/sm

Back view CF unitard
Next I used a Kwik Sew biketard pattern but changed the neckline for this as it was to be used for worship dance. I also added the long sleeves from CF pattern as the Kwik Sew pattern was sleevless.
I was very happy how this turned out. I did not like the instructions on how to finish the elastic though as it lead to a gap at the shoulder. It is a good idea to sew the seams and add the elastic as one piece. The biketard was made of a white cotton lycra and I lined the whole leotard to make sure that it would not "show through".

Kwik Sew 2722 front view
Kwik sew 2722 biketard back view
All the patterns have good sizing, i.e. they do not run small or large but as indicated on the pattern. All have good instructions. I have decided that lining at least the front with a nylon tricot or light weight powernet for extra support works well (better than self fabric). It works best to line each piece individually, trim away as much fabric from the seams as possible and then sew together.
I think that I am now ready to start trying to change necklines, sleeves and accents.
I'll keep you posted!


Tuesday, September 10, 2013

Went to Tutuschool NY and made.. a ballet tunic and dance boots?!

It is hard to believe but summer is officially over. Where did it go? One minute it was May, school was letting out and then boom it was September.
Last year I went to Tutu.com's tutu school for the first time and although it was intense I learned so much that I had to go again.
This year I was able to go to NY city. Although it is called tutu school, I still did not take a tutu making class (I have made lots of tutus but learned from Claudia Folt's book not by taking her class) but I did learn how to make a handsome tailored coat or dance tunic and matching dance boots.
The classes were taught by Jeremy Bernardoni and Claudia Folts of Tutu.com at the Gelsey Kirkland academy of Ballet in NY city.
Jason Hadley
Part of the trip was a fabulous tour of the NY city ballet's costume shop, http://www.nycballet.com/Explore/The-Costumes.aspx where we saw many of their famous costumes. They were very generous both with their time and sharing of information but we were asked not to share photographs on Facebook or blogs. The photo posted here is from a NY times article (http://www.nytimes.com/2009/01/03/arts/dance/03cost.html?_r=0) so i figured that was okay.
After our visit at the costume shop, we went shopping in the Garment District. Still a great place to find just about anything but sadly it is under a lot of pressure from online retailers, and the high costs of running a business in the city. Iconic stores such as Tinsel trading, Gem Fabrics and other stores are or have closed their doors because their buildings were sold or they could not longer compete. Some, like Tinsel trading will be operating online and possibly have a small storefront in the future.
I found some gorgeous silk brocades, silk velvet in a rich burgundy, soft green silk chiffon, shot silk organza and a black and silver beaded lace along with vintage ribbons, colored horsehair for hats, stretch fabrics and trims for the coat I was going to make and other future projects.
Another perk of tutu school New York was that  we were given a tour of Gelsey Kirkland's costume shop and wardrobe. Jennifer, their highly talented and overall lovely person, kindly showed us around her work space and some of the new and vintage costumes she takes care of. Gelsey Kirkland ballet was fortunate to have been able to purchase costumes from the now defunct New York City Opera. Each costume is a work of art in itself and it was inspiring to be able to see them "up-close and personal". Jennifer transformed  costumes from Faust into fabulous Carabosse  (including black wings) and her minions costumes.

Now to the actual projects I worked on. I felt a little out of my depth as my classmates were all highly talented, "professional" costumers and I am a professional amateur.  The atmosphere in class was very supportive and stimulating since everyone was willing to help or share their expertise.
I had chosen to make  Jeremy Bernardoni's Nutcracker cavalier coat. Tutu.com supplied a wonderful dark navy cotton stretch fabric and powernet for the lining. I had made the choice to add the sleeves to an undervest although the design had inset sleeves. Traditionally the sleeves on men's dance tunics are put onto a vest to give the dancer a greater range of motion. Jeremy, who studied tailoring in Paris and was also a dancer himself, had come up with a very clever design which allowed for an inset sleeve that still provided enough movement.
Powernet under vest with fabric sleeves

 The lines of the coat are like a military dress uniform tunic, with a high collar and tails at the back.

Front of the un-decorated coat
back of the un-decorated coat
Undecorated the coat looks good but a real military dress coat and especially a costume needs some serious embellishments. Claudia Folts taught the embellishment class, which included a very thoughtful discussion about lines, taste, color and what I can best describe as the goal or role of the costume. What do you want people to say about your costume when they see it?
With that in mind, we set to work looking at trims, sketching and coloring an illustration and then off course adding some trim.
It was the end of day three of my intensive and I must confess to having been very tired. I picked out a few things but was not able to sew anything onto the coat.

Epaulettes for cavalier coat
Once home again, I finished the coat by adding the hooks and bars and then began the process of embellishing the coat. Traditionally the Cavalier's costume is based on a Hussar's uniform. These feature elaborate loops, cording and soutache tape works, but no (fringed) epaullettes. I liked the look of the gold fringe with a gold and navy braid so I added it. The coat will not be totally "authentic" but it is a costume so I think it will be okay.
At this time I have made a start on the embellishment but it will take a while for me to decided exactly what I'd like the coat to look like. I made the epaulettes and finished the neck but am still working on the back, sleeves and front. I will add photos once I am done.
Nutcracker coat with epaulettes
Since my last post I have been slowly working on my Nutcracker coat. I finally finished the back of the coat with scrolls and trim.
back view of Nutcracker coat

For inspiration, I looked at historical officers' dress uniforms and discovered that  I had made a "mistake". Most Nutcracker coats are based in a Hussar uniform but these uniforms do not have fringed epaulettes. My coat does.  I finally found some examples of uniforms (not naval uniforms which often do have fringed epaulettes) that I could use as inspiration and set to work designing the cuffs and front. These uniforms have elaborate scrolls and knots made out of soutache tape, braid or cord.
I finally found a "pattern" from a historical book which I could draw out and then use as a template to make my design.
Nutcracker coat cuff design
I recently finished making two cuff appliques and have attached them to the coat. I like the way it looks and based on my research it is fairly authentic. I made the cuff decorations as an all in one appliques so that it can be removed when the coat is laundered. The coat is made of a wonderful stretch cotton, so it is washable (!), comfortable, breathable and due to the stretch fits perfectly.
Nutcracker coat with cuff appliques.

After this I will approach the front of the coat, and of course keep you posted.

Wednesday, August 14, 2013

Stretching a bit: learning how to make custom leotards, unitards and things with stretch fabrics

I took the plunge, I am stretching to new ground. Like many people who sew and costumers initially we shy away from stretch fabrics. They look great but require a different type of sewing and the fabrics behave differently than other types of fabric: they stretch.
I had made a few things with stretch fabrics before and it had not been a success. This was mostly because I used the wrong needles, did not play with the stitch length and tension and hadn't done my home work.
There are some basic things you need to know about working with stretch fabrics:
1) use the right needles on your sewing machine. Use at least a ball point needle but ideally a stretch needle.
2) play around with some scraps to set the stitch length and thread tension correctly.
3) when laying out your fabric do a single layer lay-out, making sure you flip the pattern pieces to get mirror images.
Single layer fabric layout

4) use really sharp scissors or a rotary cutter to cut neatly. Lycras often do not ravel so if you cut neatly you will have nice finished edges.
5) use fine pins (I like to use the glass headed pins) and pin only in the seam allowances to avoid marking your fabric.
6) mark the fabric carefully with outward facing clips, a disappearing fabric marker or pattern tracing paper. It makes things so much easier to match up well and saves a lot of time.
Carefully marking where seams go saves time
7) use a walking foot or even feed foot to prevent "tunelling" when stitching down fabrics.
You can stitch stretch fabrics using a wide zigzag stitch and then straight stitch just inside along the seam allowance. There are several good tutorials on Youtube (here is one that is great for the "basics" http://www.youtube.com/watch?v=ZEOjwcI5M9U or this one from Jalie, less explanation but great if you are a visual learner http://www.youtube.com/watch?v=DTZReQxc9r8). I purchased a class from Craftsy:Sewing fashion Knits beyond the basics because it dealt with some more "advanced" techniques and I can watch it whenever I want and as many times as I want so I felt it was money well spent.
baste 1/4 seams
Seam allowances for leotards are narrow,  usually 1/4", so it is important to sew them carefully. You can serge the edges but it is a good idea to "baste" sew them first. Once the seams are sewn, you can serge them. Elastics can be sewn into the arm and legs.

Front view of the leotard


Use a zigzag stitch to sew the elastics in and then turn under. Using a dual needle you can stitch down the edges, to create a finished edge.
Back view of the leotard

After posting this I went back and found that a great web-site I had found that explained a lot about making leotards and also how to draw a sloper has been taken down. The web-site called : patternschool.com still comes up in searches, and many of the pictures of the basic leotard slopers appear on Pinterest but the actual site is no longer there. I hope that it will return but otherwise I may have to try to come up with something myself.


Tuesday, June 18, 2013

Wedding splendor

My brother was recently married to a lovely young lady. To celebrate this happy occasion I pulled out all the stops to create some lovely clothing for myself, my mother and my sister-in-law. My brother's fiance now wife loves the "Roaring Twenties", so I offered to make her a 1920's inspired veil out of silk and some vintage lace I had.
When it comes to historical clothing, I try to be as authentic as possible. There is a lot of "flapper style" and 1920's  style clothing out there that no self respecting women of the time would have worn to a party, let alone to her wedding.
not 1920's style
Dresses in the 1920's had dropped waists (i.e. were not body hugging or tight fitting) came at least to the knee, and did not feature midriff baring cut-outs, plunging necklines or no backs. They tended to be very "demure". Wedding veils were a a type of mob cap with flowers on both sides of the head or large cloche hats.
A bride in 192o's on her wedding day
Not everyone looks good with a lace cap and some big bunches of flowers over their ears (let's face it it is a "different" look). Since I had some authentic 1920's lace I was able to simulate something that was closer to the period. My sister-in-law loves lotus flowers so I made one large lotus flower out of silk organza, with Swarovski crystals and pearls for the centers. I also added some authentic 1920's style ribbon work flowers in pale blue and ivory. The lace was no longer white but a lovely creamy ivory and I made a silk covered head band as the base. My sister-in-law did not want a long veil.

laces loosely pinned to head form


Not long ago I purchased an e-book from Prudence millinery  explaining how to make couture fabric flowers and headbands, and I used these instructions to construct the veil's base. 
Front view of completed veil
Side view of completed veil    

After making the veil I made myself a dress and made matching hats for myself and my mother. My dress was made of a very pretty polyester chiffon and my mother's dress was a grey Duponi silk.

Beginnings of dress and hats
My hat was a large flower, while the two hats I made for my mother were a similar flower in grey and black silk and a large horse hair bow with netting on a silk base.
Black and grey Duponi silk hat


Chiffon and silk cocktail hat with veiling

Horsehair, black silk and Russian veiling hat

The wedding was lovely: my sister-in-law looked very beautiful and my brother was radiantly happy.